Headlight Restoration: From Foggy to Clear
The $30–$50 Service That Builds Trust Fast
Foggy headlights make even a clean vehicle look tired. Worse, they kill nighttime visibility and can instantly make customers feel like their car is “old.”
The good news? Headlight restoration is one of the easiest high-profit services a detailer can offer. and one of the most satisfying transformations customers can actually see happen in real time.
This is the kind of service that gets:
Before-and-after photos shared online
Repeat customers
Add-on sales
Referrals from neighbors and family
And honestly, most people have no idea how simple the process really is when done correctly.
Why Headlights Turn Yellow
Modern headlights are made from polycarbonate plastic, not glass. Over time:
UV rays break down the factory coating
Oxidation forms on the surface
Road grime and chemicals dry out the lens
Automatic car washes speed up the damage
A quick polish might make them look better for a week… but without proper prep and UV protection, they’ll haze right back over.
That’s where professional technique matters.
What You’ll Need
Sandpaper (Wet Sanding)
600 grit
1000 grit
1500 grit
2000 grit
3000 grit
Compounds & Protection
Cutting compound
Finishing polish
UV protection coating or ceramic coating
Tools
DA polisher or drill attachment
Foam cutting pad
Microfiber towels
Spray bottle with water + a drop of soap
Masking tape

Recommended Products (Affiliate Friendly)
Sanding Discs & Abrasives
Mirka Abralon Sanding Discs »
3M Trizact 3000 Foam Discs »
Compounds & Polishes
Sonax CutMax Compound »
Koch-Chemie Heavy Cut H9.02 »
CarPro Reflect Polish »
UV Protection (Most Important Step)
Gtechniq C4 Permanent Trim Restorer »
CarPro DLUX Plastic & Wheel Coating »
Optimum Opti-Lens Coating »
Full Restoration KitS
3M Heavy Duty Headlight Restoration Kit »
Lake Country Headlight Restoration System »
Step-by-Step Headlight Restoration Process
Step 1: Clean the Headlights Thoroughly
Before sanding anything, fully decontaminate the surface.
Use:
APC or strip soap
Clay towel if necessary
IPA wipe-down
Pro Tip:
If the lens feels rough, contaminated plastic will clog sandpaper instantly.

Step 2: Tape Off the Surrounding Paint
Don’t skip this.
Use automotive masking tape around:
Fender edges
Bumper edges
Rubber trim
A burned edge on a customer’s bumper will ruin the entire job.

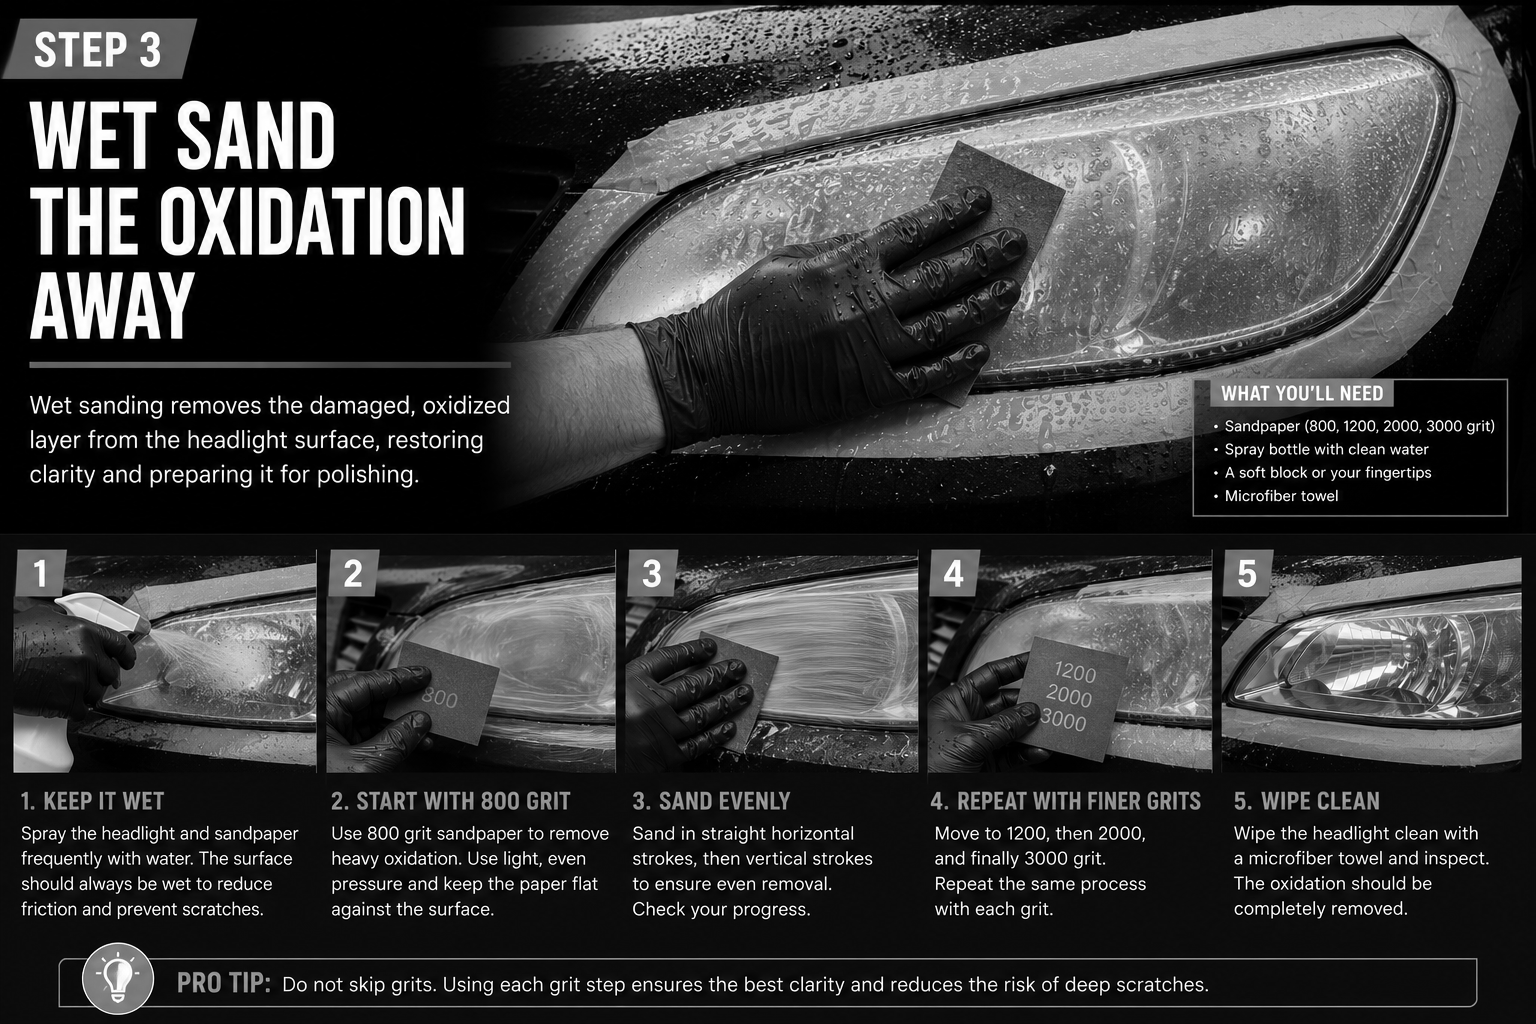
Step 3: Wet Sand the Oxidation Away
This is where the magic happens.
Typical Sanding Progression:
600 grit → severe oxidation
1000 grit
1500 grit
2000 grit
3000 grit finishing pass
Always sand in alternating directions:
Horizontal
Then vertical
Then horizontal again
This helps you see when previous scratches are fully removed.
Important:
Keep the surface soaked with water the entire time.
If you dry sand:
Heat builds up
Plastic can distort
Sanding marks become harder to remove
What the Lens Should Look Like
A lot of beginners panic here.
After sanding, the lens should actually look:
Flat
Smooth
Completely dull
That means you removed the oxidation correctly.
If you still see shiny yellow spots after sanding, oxidation remains under the surface.
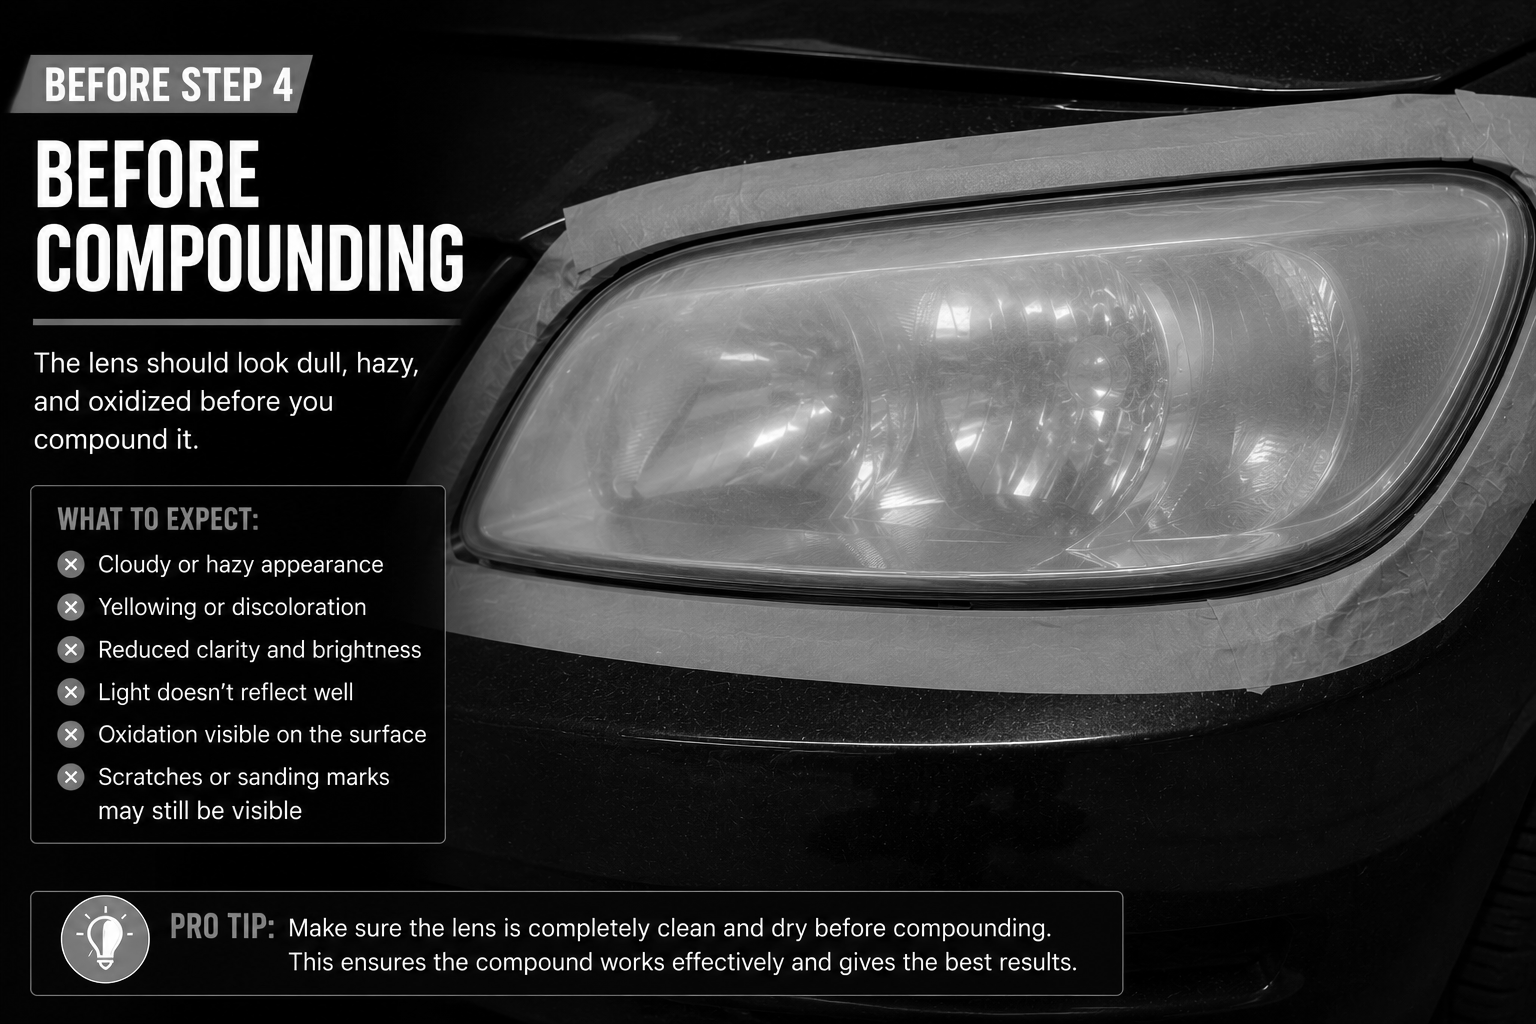
Step 4: Compound the Lens
Now polish the clarity back in.
Using a DA:
Medium/heavy cut foam pad
4–5 passes
Moderate pressure
The clarity usually comes back FAST at this stage.
Common Mistake:
Trying to polish before fully sanding.
Polish does not remove deep oxidation. it only refines scratches.

Step 5: Finish Polish
Switch to:
Softer foam pad
Finishing polish
This removes haze and boosts transparency.
You want the lens looking:
Crisp
Deep
Almost wet

Step 6: Protect the Lens (DO NOT SKIP)
This is the difference between:
A professional restoration
A temporary fix
If you leave raw plastic exposed, oxidation returns quickly.
Best Protection Options:
Good
Ceramic coating
Better
Dedicated UV headlight coating
Best
2K clear coat (advanced/pro-level)

Pro-Level Tips Most Beginners Don’t Know
1. Don’t Chase Perfection on Cracked Lenses
Internal cracking cannot be polished out.
Be honest with customers upfront.
That honesty builds long-term trust.
2. Use a DA Instead of a Drill
Drills create uneven pressure and heat.
A DA:
Finishes cleaner
Runs cooler
Looks more professional
3. Charge More for Severely Oxidized Lights
Some headlights take:
20 minutes
Others take 90+
Price based on condition, not just “a set.”
4. Take Before & After Photos Every Time
This service is social media gold.
Headlight transformations:
Perform extremely well on Instagram Reels
Work great for TikTok
Create easy Google Business content
5. Offer It as an Add-On Service
Perfect upsell opportunities:
Paint correction
Ceramic coatings
Interior details
Wash memberships
A customer already spending money is much more likely to say yes.
Pricing Strategy for Detailers
Beginner Pricing
$40–$60 per pair
Intermediate
$80–$120 per pair
Advanced / Coated / Warranty Included
$150+
Most customers happily pay once they see:
Safety improvement
Cosmetic improvement
Replacement cost savings
New OEM headlights can cost thousands now.
Final Thoughts
Headlight restoration is one of those services that never really goes out of style.
It’s affordable for customers.
Fast for detailers.
And the visual payoff is massive.
More importantly, it’s the kind of work that helps people trust you.
Anybody can spray tire shine.
But restoring something worn out and making it look new again?
That’s where craftsmanship shows.
And in detailing, craftsmanship always markets itself.